‹ Back to the app

myHHD: How to

Short guides for what you need right now. Button and screen names in the app are in bold. Brief help is also in the app itself, under the question mark next to a heading.

Čeština · Dansk · Deutsch · English (UK) · Español · Français · Italiano · Magyar · Nederlands · Norsk (bokmål) · Polski · Português (Portugal) · Slovenčina · Suomi · Svenska · Українська

Getting started

Install the app on your phone

The app runs in the browser too, but once installed it opens from your home screen like any other app and works offline.

iPhone and iPad

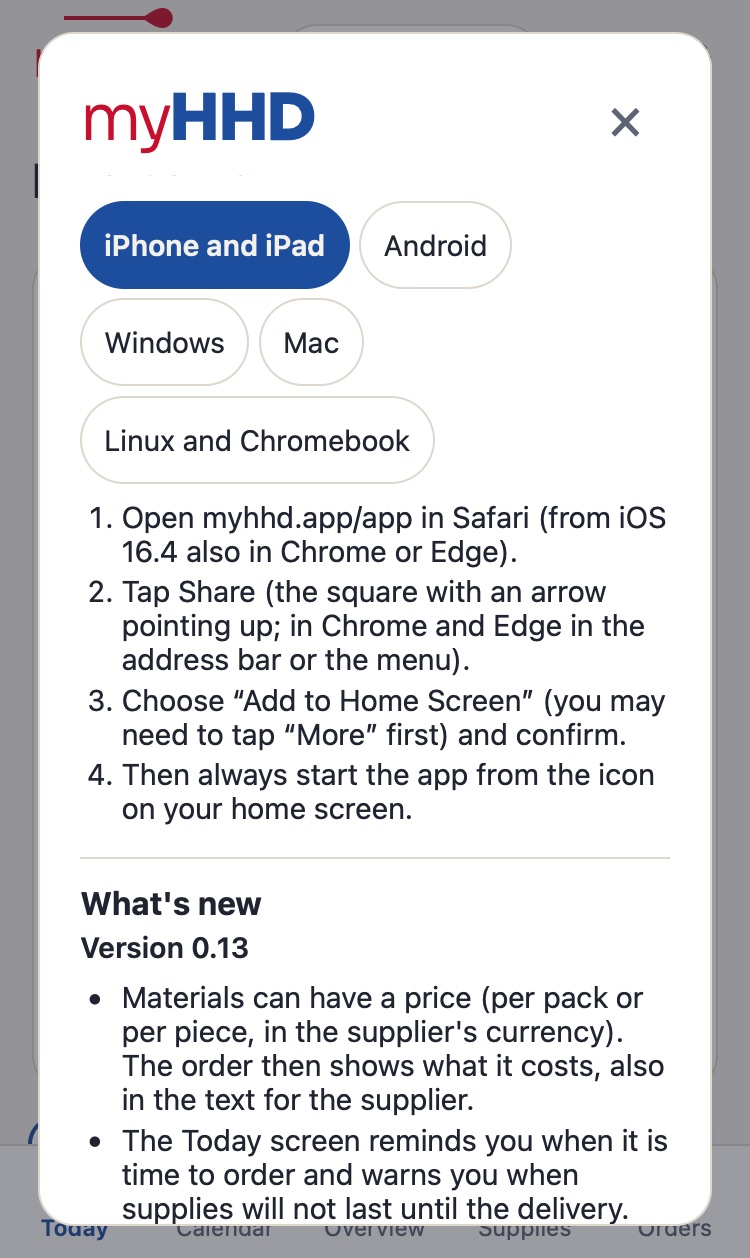
  1. Open myhhd.app/app in Safari (from iOS 16.4 also in Chrome or Edge).
  2. Tap Share (the square with an arrow pointing up; in Chrome and Edge in the address bar or the menu).
  3. Choose “Add to Home Screen” (you may need to tap “More” first) and confirm.
  4. Then always start the app from the icon on your home screen.

Android

  1. Open myhhd.app/app.
  2. Chrome: menu ⋮ at the top right > “Install app” or “Add to Home screen”.
  3. Samsung Internet: menu ☰ at the bottom > “Add page to” > “Home screen”.
  4. Firefox: menu ⋮ > “Add to Home screen”.

Windows

  1. Open myhhd.app/app in Edge or Chrome.
  2. Click the install icon on the right of the address bar.
  3. Or in Edge menu … > Apps > Install this site as an app; in Chrome menu ⋮ > Cast, save and share > Install page as app.
  4. Firefox usually cannot install apps; use Edge or Chrome.

Mac

  1. Safari: open myhhd.app/app, then the File menu > Add to Dock.
  2. Chrome or Edge: the install icon on the right of the address bar, or menu > Cast, save and share > Install page as app.
  3. Firefox usually cannot install apps; use Safari, Chrome or Edge.

Linux and Chromebook

  1. Open myhhd.app/app in Chrome, Chromium or Edge.
  2. Click the install icon on the right of the address bar, or menu ⋮ > Cast, save and share > Install page as app.
  3. Firefox usually cannot install apps; use Chrome or Chromium.
About window, Installation section with the iPhone steps
↑ Contents

First setup

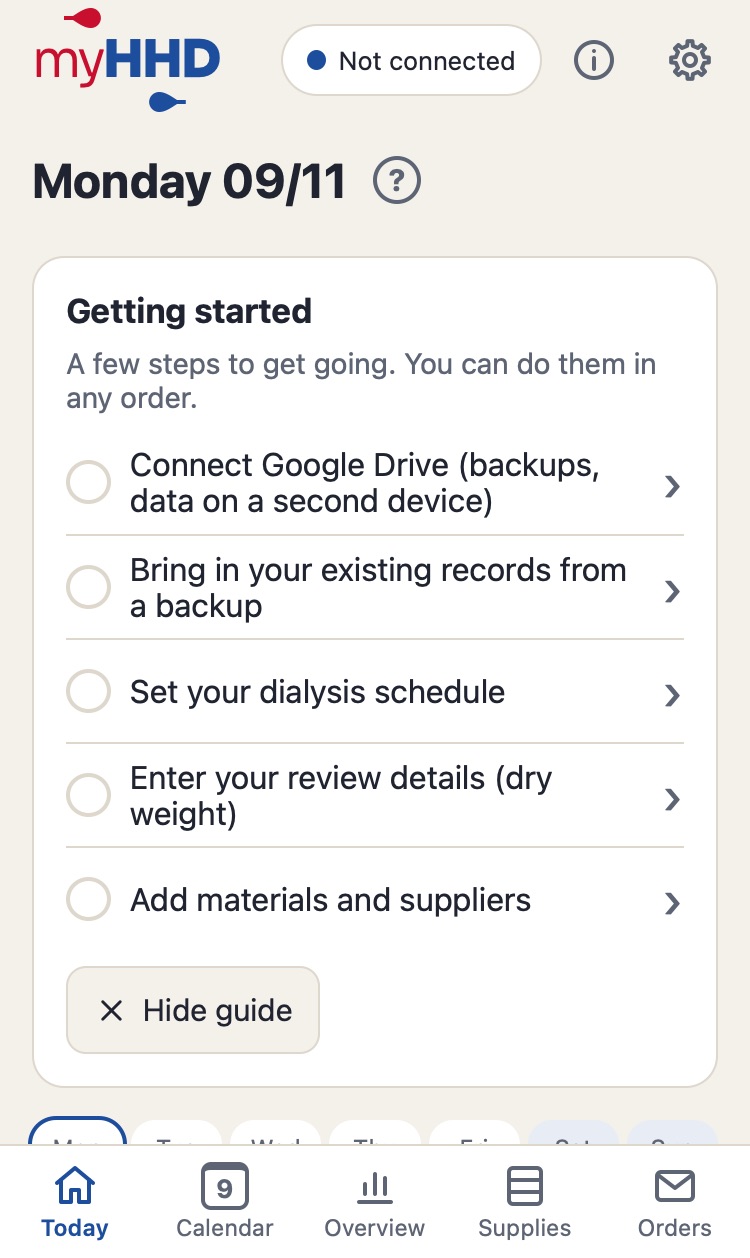
Right after installing. The Today screen shows the Getting started guide. You can do the steps in any order; tapping a step opens the right setting.

  1. Set your dialysis schedule: the days of the week you dialyse.
  2. Enter your review details: dry weight and other details from your dialysis unit.
  3. Add materials and suppliers: for each item its pack size and usage rule (for example per dialysis, or every 14 days).
  4. Connect Google Drive: your data is backed up to your own Drive and available on other devices.
  5. Have a backup from before? Bring in your existing records from a backup.

Finished steps get ticked off. You can put the guide away with Hide guide; everything is then in Settings (the cog in the top right corner).

Today screen with the Getting started guide and five steps
↑ Contents

Add materials and suppliers

For every item you want to track in supplies and orders.

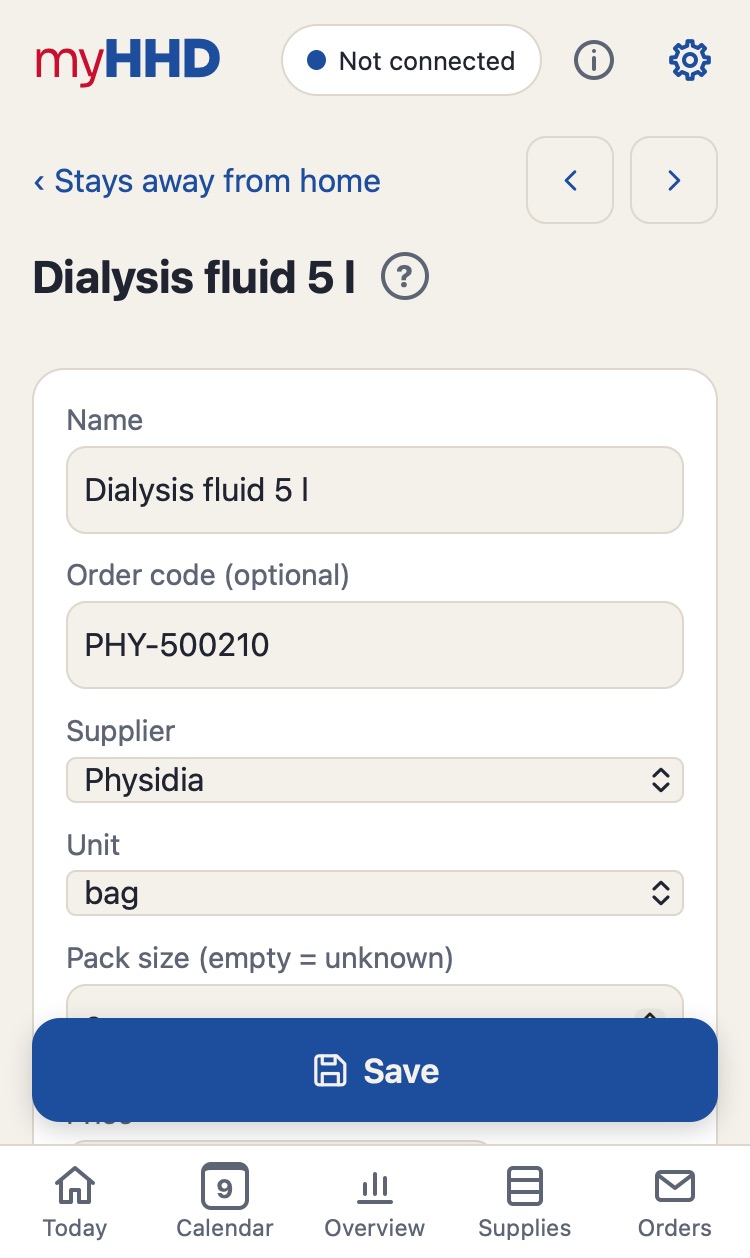
  1. Settings → Materials → Add item (or New item in Supplies).
  2. Fill in Name, Unit and Pack size, and the Order code if you have one.
  3. Choose the Supplier, or create a new one (+ New supplier).
  4. Under Usage, set how much of it you use: per dialysis, on a given day of the week, every N days (changes), or manually.
  5. For a new item, enter the Current quantity (what you have at home now) and tap Save.

The pack size is used to order whole packs. If you do not know it, leave it empty. The Price is optional, per pack or per piece, in the supplier's currency; the app adds up what the order costs. The supplier's e-mail or phone and the way you order are set in Orders → supplier → Edit.

Editing an item: name, order code, supplier, unit and pack size
↑ Contents

Every day

Record today's dialysis

At every dialysis, on the Today screen.

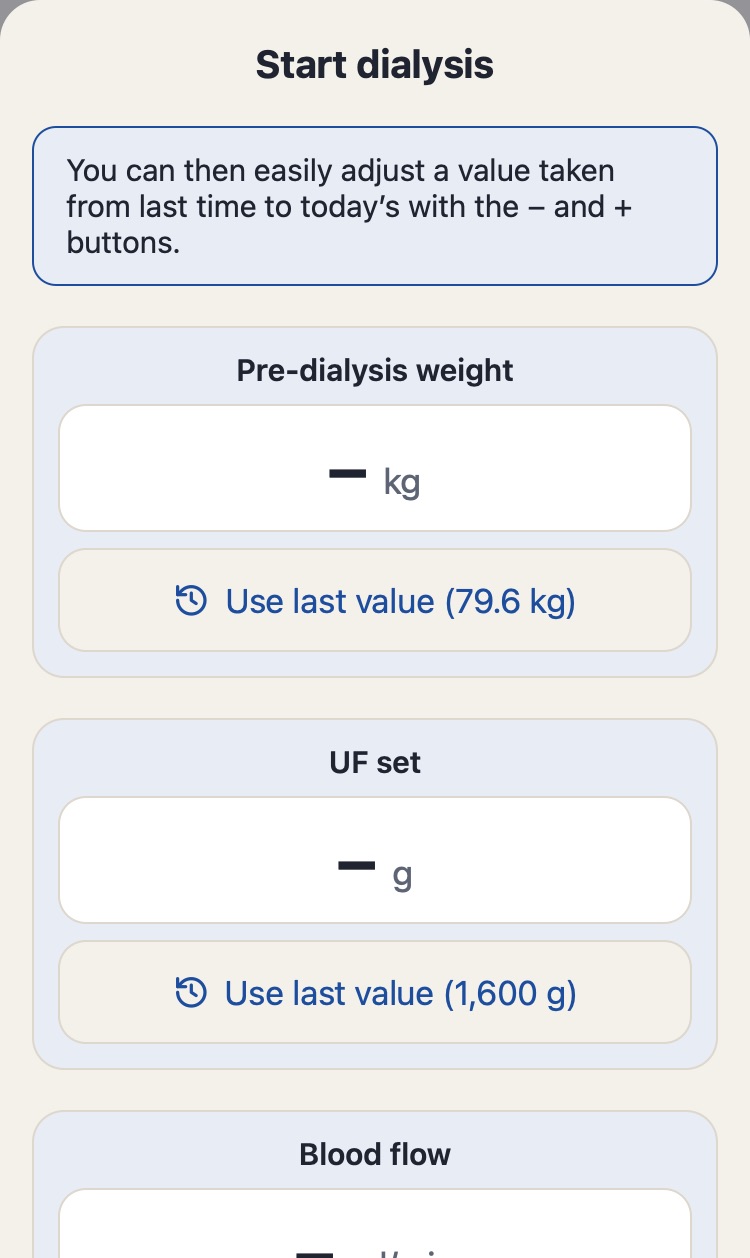
  1. Tap Start dialysis.
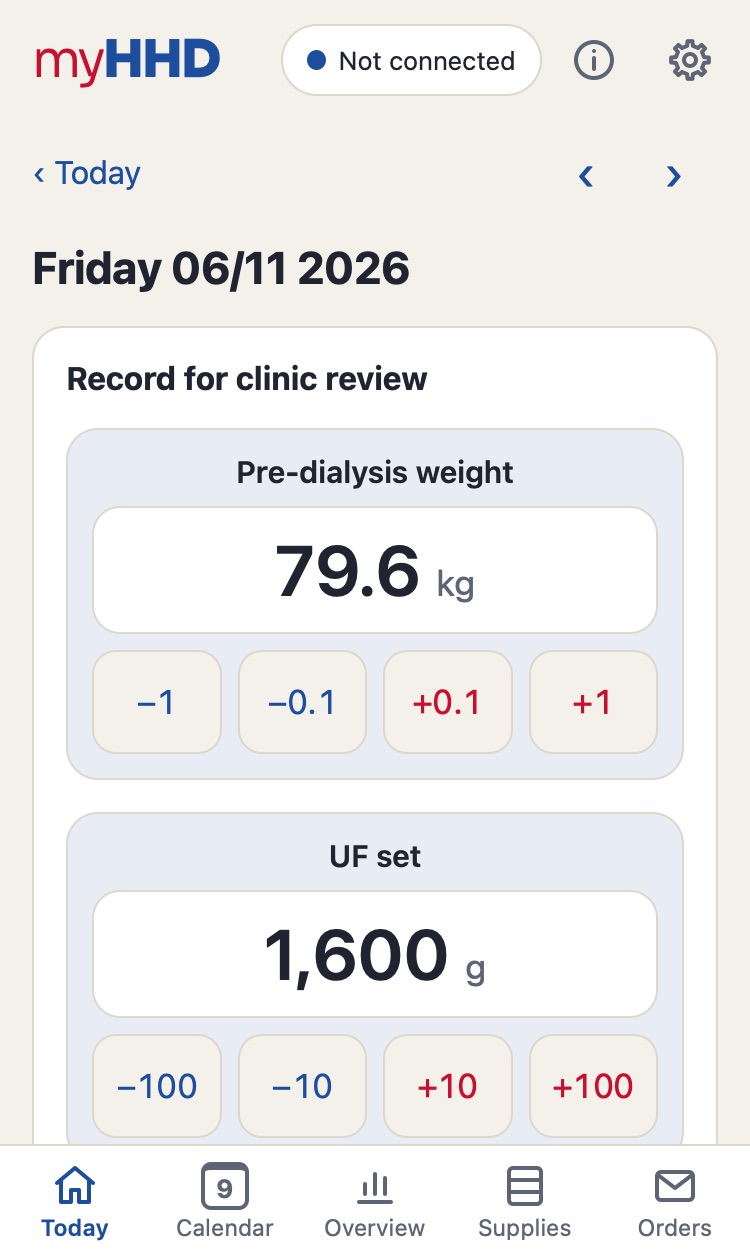
  2. Enter the pre-dialysis weight, UF set and blood flow. Tap a field to type a number. Use last value fills in the value from your last dialysis; adjust it with − and +.
  3. Confirm. The app reminds you of material changes that are due.
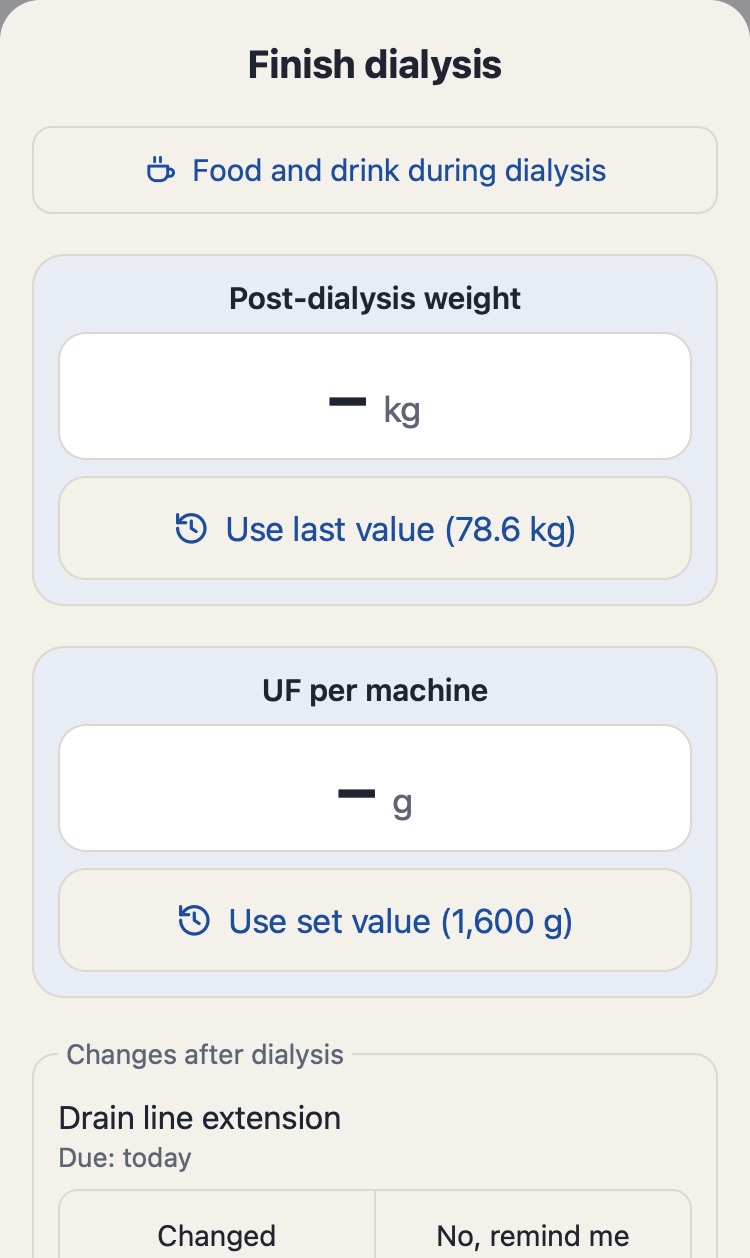
  4. After dialysis, tap Finish dialysis and enter the post-dialysis weight and UF per machine. Use set value fills in today's set UF; adjust it to the machine with − and +.
  5. For each change, choose Changed or No, remind me, and Confirm.

No time to weigh yourself? Use Record dialysis without weighing. Food and drink during dialysis is recorded with the cup button; if you make a mistake, correct the total by tapping the running dialysis frame (Edit entered values). You only record values: the app does not calculate UF or recommend anything.

Start dialysis window with pre-dialysis weight, UF set and Use last value buttonsFinish dialysis window with post-dialysis weight, UF per machine and changes
↑ Contents

Record dialysis without weighing, or later

You did not get to weigh yourself, or you forgot to record a dialysis.

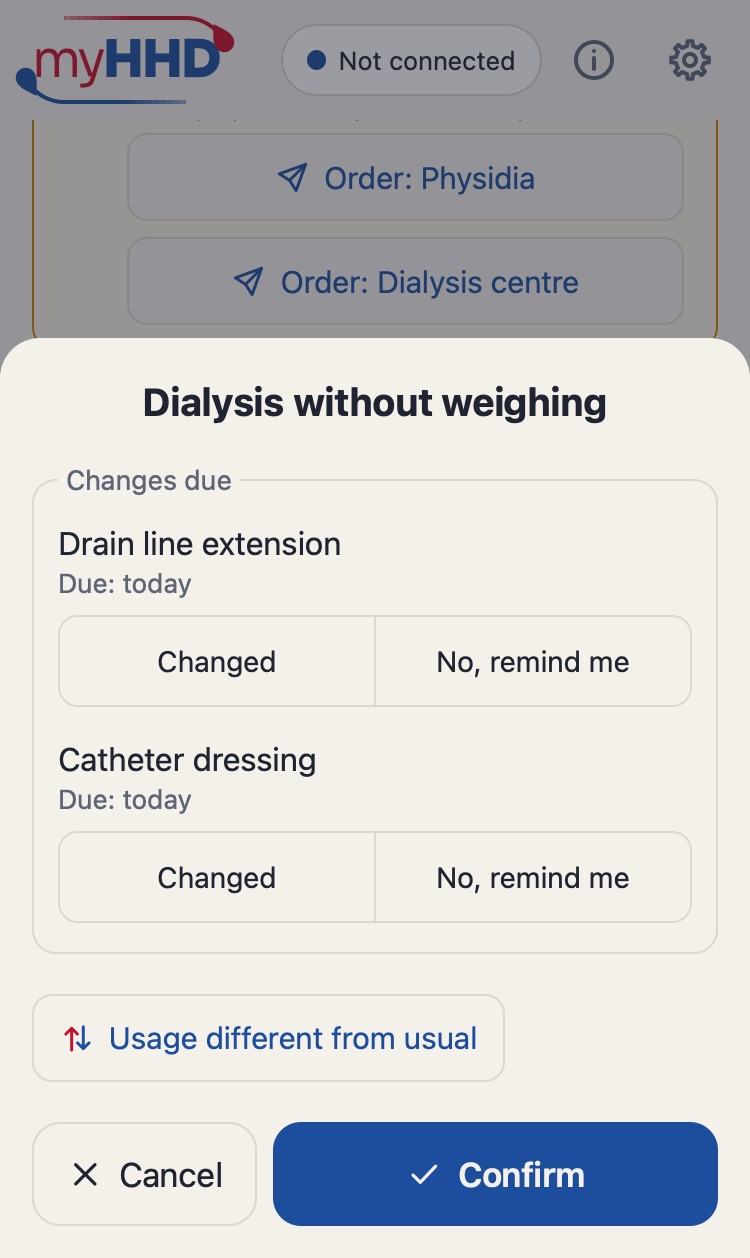
  1. Today's dialysis without weighing: on Today, tap Record dialysis without weighing.
  2. Fill in what you know. All values are optional.
  3. Confirm. The dialysis is recorded as done and materials are deducted as usual.
  4. A forgotten dialysis from an earlier day: in the Calendar, tap the day → Add dialysis.

Dialysis away from home is recorded the same way, on Today or in the day details.

Dialysis without weighing window
↑ Contents

Dialysis did not take place or was moved

A dialysis was planned but did not take place, or you did it on another day.

  1. In Calendar or in the week on Today, tap the day it did not take place.
  2. Tap Dialysis did not take place.
  3. The day stays in the calendar as missed but no longer counts towards the week. Stock does not change, supplies are only deducted for recorded sessions.
  4. Record the dialysis on the other day as usual; it counts even outside the plan.

Quicker: in the Calendar, turn off the switch on that day. Turn it back on to remove the mark, or tap Remove mark in the day detail.

↑ Contents

Fix a typo or cancel an entry

You got a number wrong, or started a dialysis by mistake.

  1. Today's finished dialysis: on Today, tap Edit. An earlier day: tap the day in the Calendar.
  2. Correct the values in the day details and tap Save correction.
  3. Dialysis started by mistake: on Today, tap Cancel start and confirm with a second tap. The supplies go back into stock.
  4. A dialysis started yesterday (past midnight or forgotten) stays on Today as in progress. A new one can only be started once it is finished or its start is cancelled.

Nothing is ever deleted for good. A correction is saved as a new record and the original stays in the history, so a wrong tap cannot lose your data.

Day details with the dialysis values
↑ Contents

Usage different from usual

A faulty item, extra material, a change outside the plan, or something you did not need.

  1. During dialysis: on Today, the Supplies button. When finishing: in the Finish dialysis window, Usage different from usual. Another day: tap the day in the Calendar.
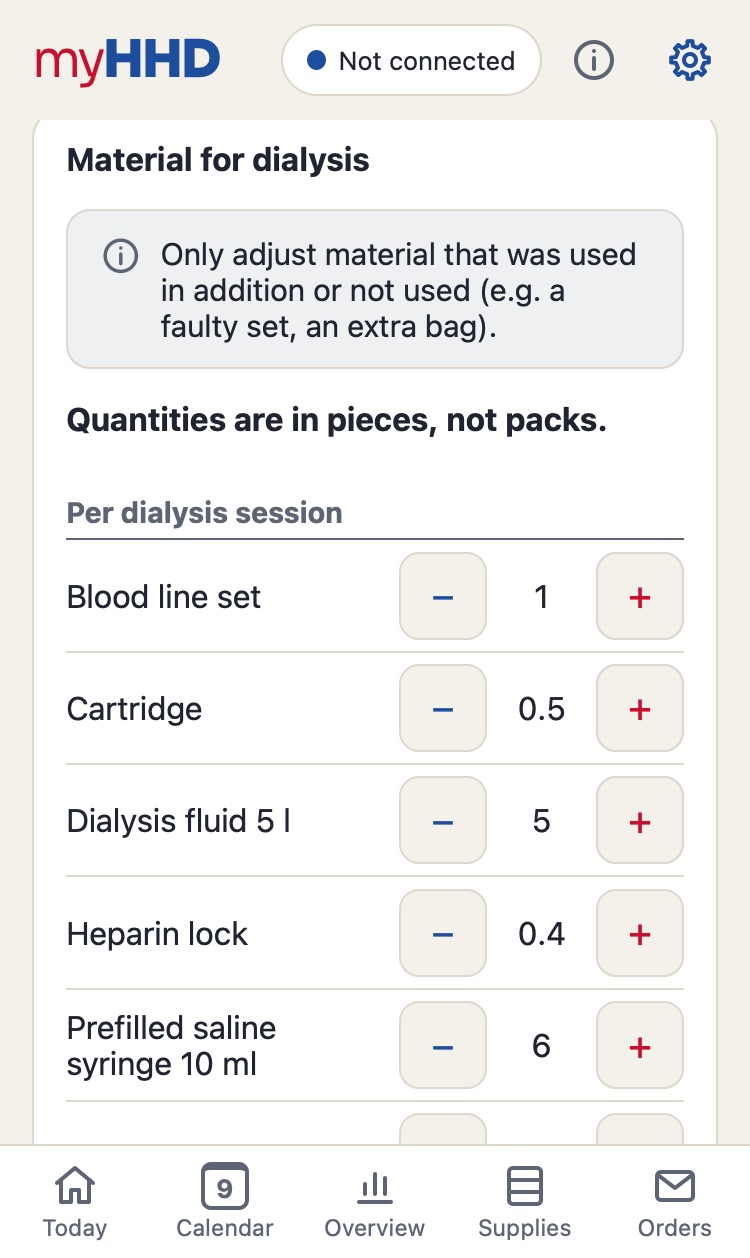
  2. In the Material for dialysis section, use − and + next to the item to set how much more or less you used. Counts are in units, not packs.
  3. Save usage. Supplies are recalculated straight away.

Has your usage changed for good? Change the item's usage rule: Settings → Materials → item. In Rule applies from choose when the change starts (for example an exchange moving from Thursday to Monday): the calendar, exchanges and forecast are replanned from that day. The item detail shows a planned change, and you can cancel it when editing the item.

Material for dialysis in the day details, with − and + for each item
↑ Contents

Supplies and orders

A delivery has arrived

When your supplier delivers materials.

  1. On delivery day, Today shows a Record delivery button. Any other time: Supplies → Stock change.
  2. Check the supplier and date.
  3. Enter what arrived for each item, in units or in packs.
  4. Save stock change.

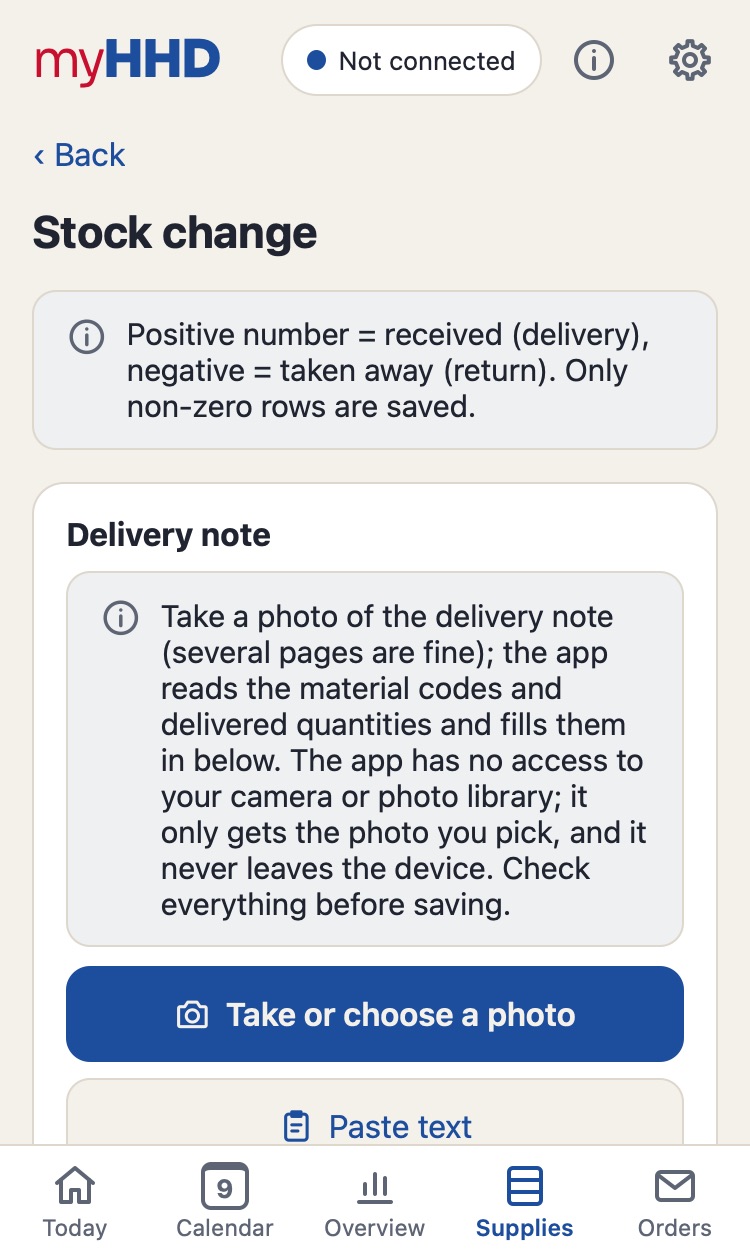
You can just take a photo of the delivery note (Take or choose a photo) and the app fills in the quantities. The app has no access to your camera or photo library; it only gets the photo you pick, which never leaves your device. Returning materials? Enter a negative number.

Stock change screen with the supplier's items
↑ Contents

Return materials

Your supplier takes materials back (surplus, faulty batch).

  1. Supplies → Stock change.
  2. Check the supplier and date.
  3. For the returned material enter a negative number, for example −2.
  4. Save stock change.

One stock change can record both what arrived (positive) and what was taken away (negative).

↑ Contents

Send an order

Before the next delivery. Before a delivery, Time to order appears on Today (how many days before is set for the supplier). The app works out what needs ordering.

  1. Order on Today, or Orders → tap the supplier.
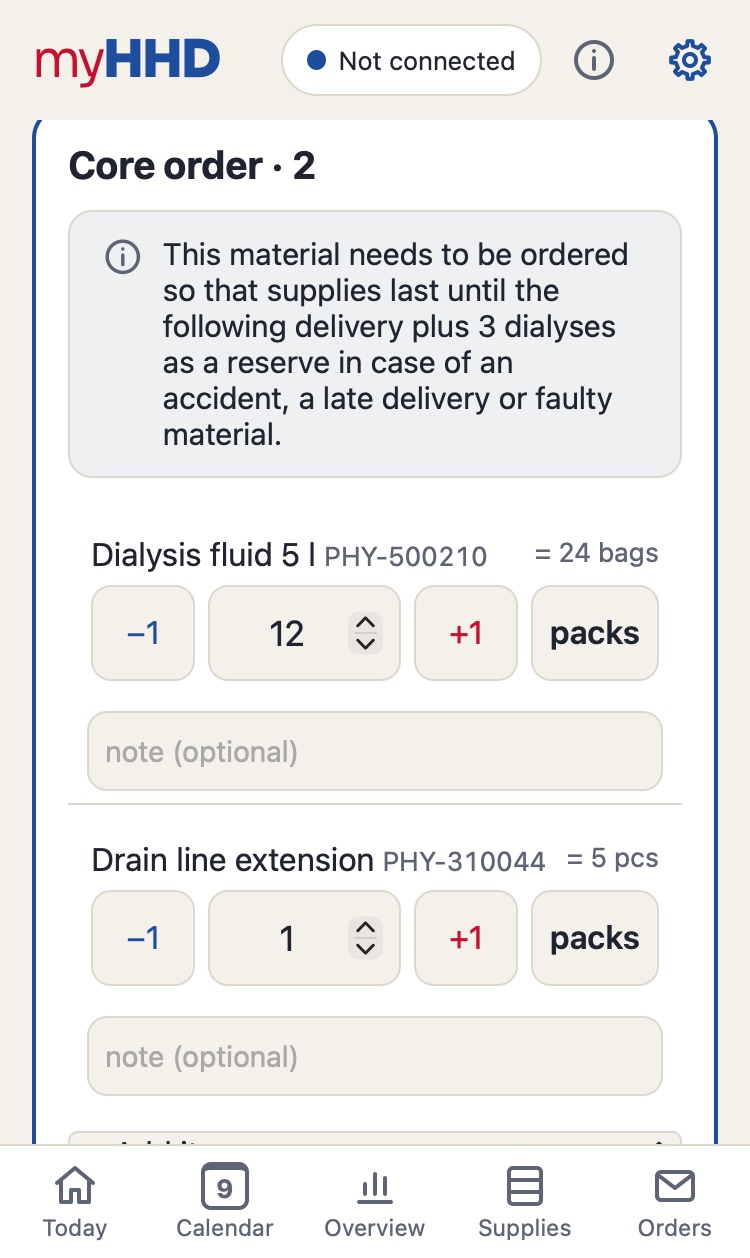
  2. The Core order shows what needs ordering so that your supplies last until the next delivery, in whole packs.
  3. Adjust the numbers with −1 and +1; add a missing item with + Add item.
  4. The How long supplies last with this order chart shows right away how far the entered quantities take your supplies (blue hatched). Items under Possible additions are shown separately, only as a dotted outline.
  5. Send order: an e-mail, WhatsApp or text message opens with the order ready, depending on the supplier's settings.
  6. The order is saved to the history and the app takes it into account.

Ordered by phone? Tap Record only (sent another way) so the app counts the order.

Supplier order: Core order with pack counts
↑ Contents

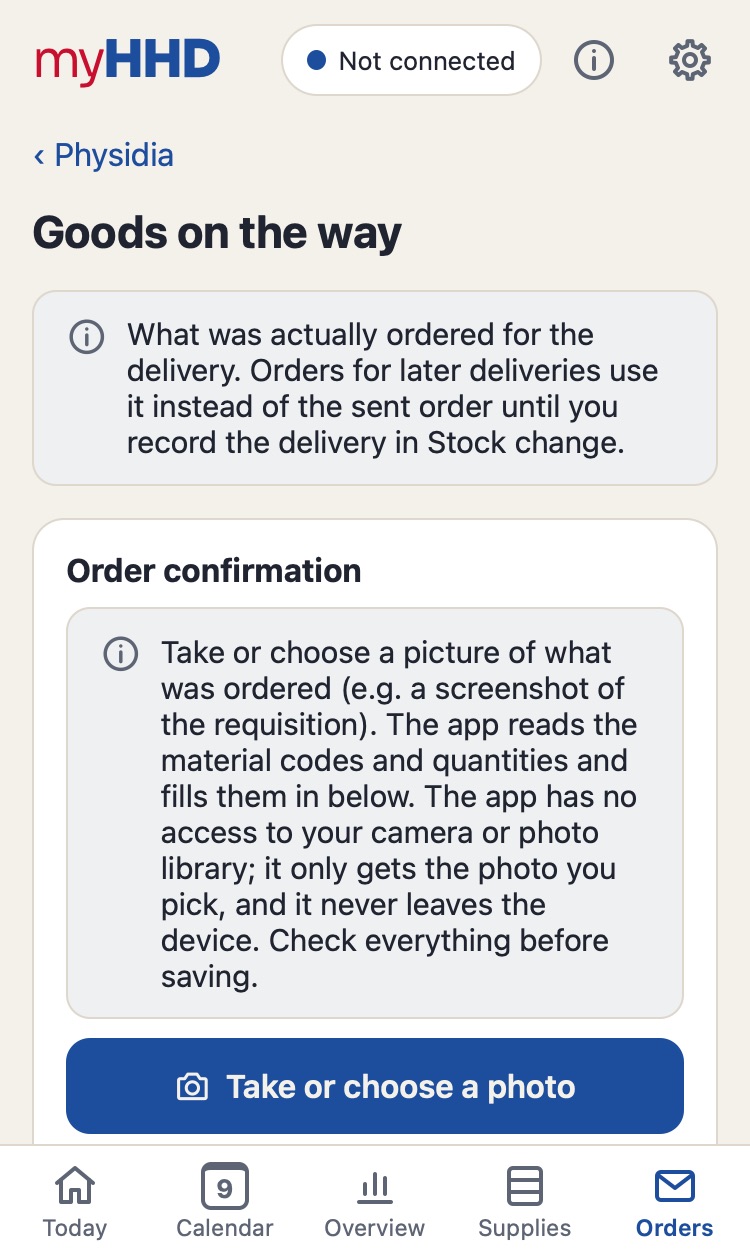
The supplier has confirmed what is coming

Your supplier sent an order confirmation, or you know what will actually arrive.

  1. Orders → supplier → in the On the way section tap Enter goods on the way.
  2. Enter the Delivery date and the quantities from the confirmation. In Order confirmation you can take a photo of it (Take or choose a photo) or paste it as text (Paste text) and the app fills in the quantities. Check them before saving.
  3. Save goods on the way.
  4. On delivery day, the Stock change is pre-filled from the goods on the way; you only adjust the differences.

Further orders count the goods on the way instead of the sent order until you record the delivery.

Goods on the way screen with the order confirmation
↑ Contents

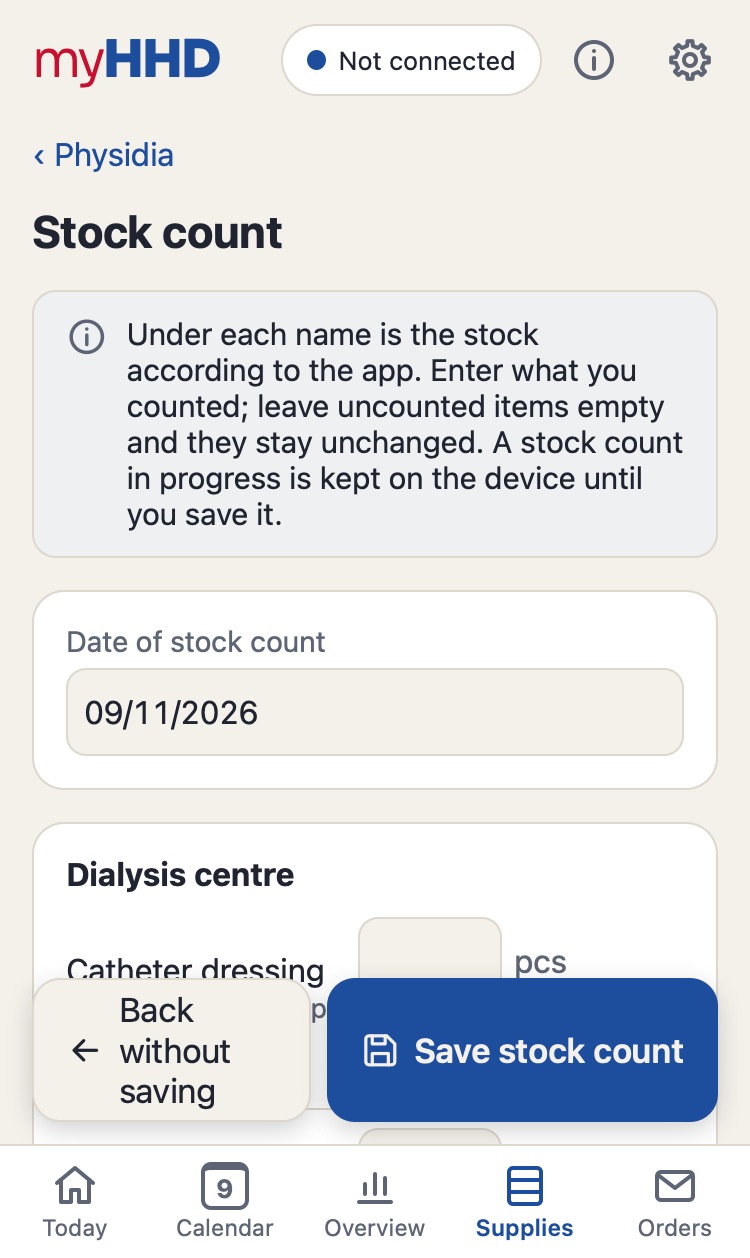
Do a stock count

Now and then, so that the app matches reality. The app reminds you with Time for a stock count.

  1. Supplies → Stock count.
  2. Under each item's name is the stock according to the app. Enter what you counted; leave uncounted items empty.
  3. Save stock count.
  4. The app asks whether the other items match: Yes, the others match or No, save only the counted items.

An unfinished count stays on your phone until you save it. You can also recount a single item in its details: Supplies → tap the item.

Stock count screen with the app's stock and a field for the counted quantity
↑ Contents

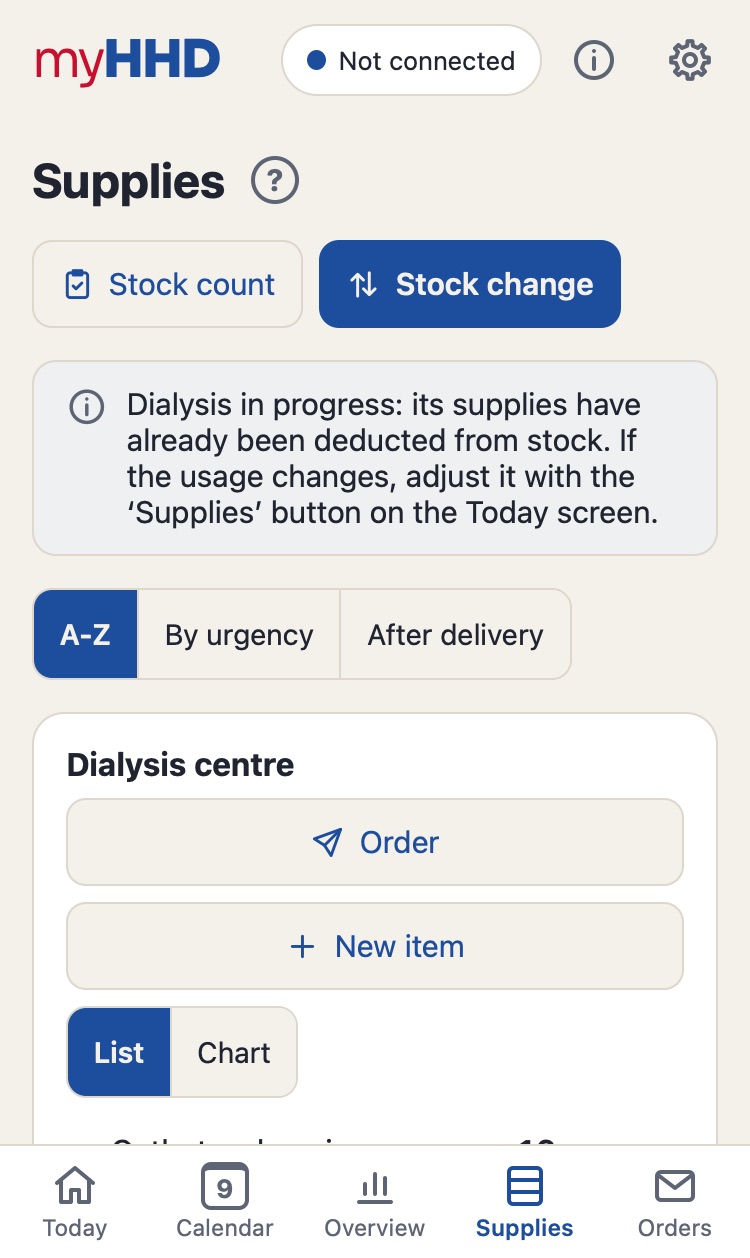
How long will it last?

Whenever you want to know what will run out soon.

  1. Open Supplies. The colour of each item shows how long it will last, and under the name it says until when.
  2. The By urgency switch at the top puts what runs out first at the top.
  3. The Chart switch in a supplier card shows its items on a timeline. Vertical lines are deliveries.
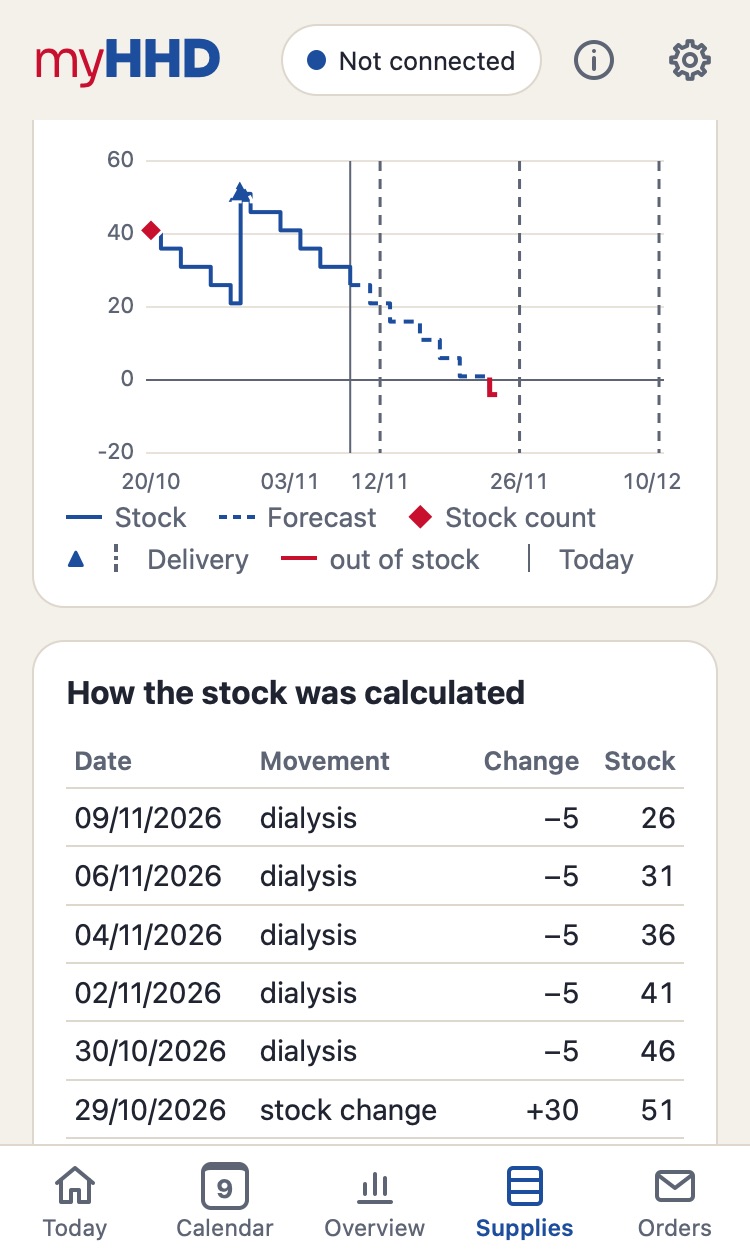
  4. Tap an item to see its stock, chart and How the stock was calculated.
  5. At the bottom, Download PDF: a chart and a list for each supplier, most urgent first. In the window, choose which suppliers to include.

Items with manual usage are not forecast.

Supplies by supplier, coloured by how long they lastItem details with a stock chart
↑ Contents

Away from home

Going on holiday or to the dialysis unit

When you will dialyse somewhere else.

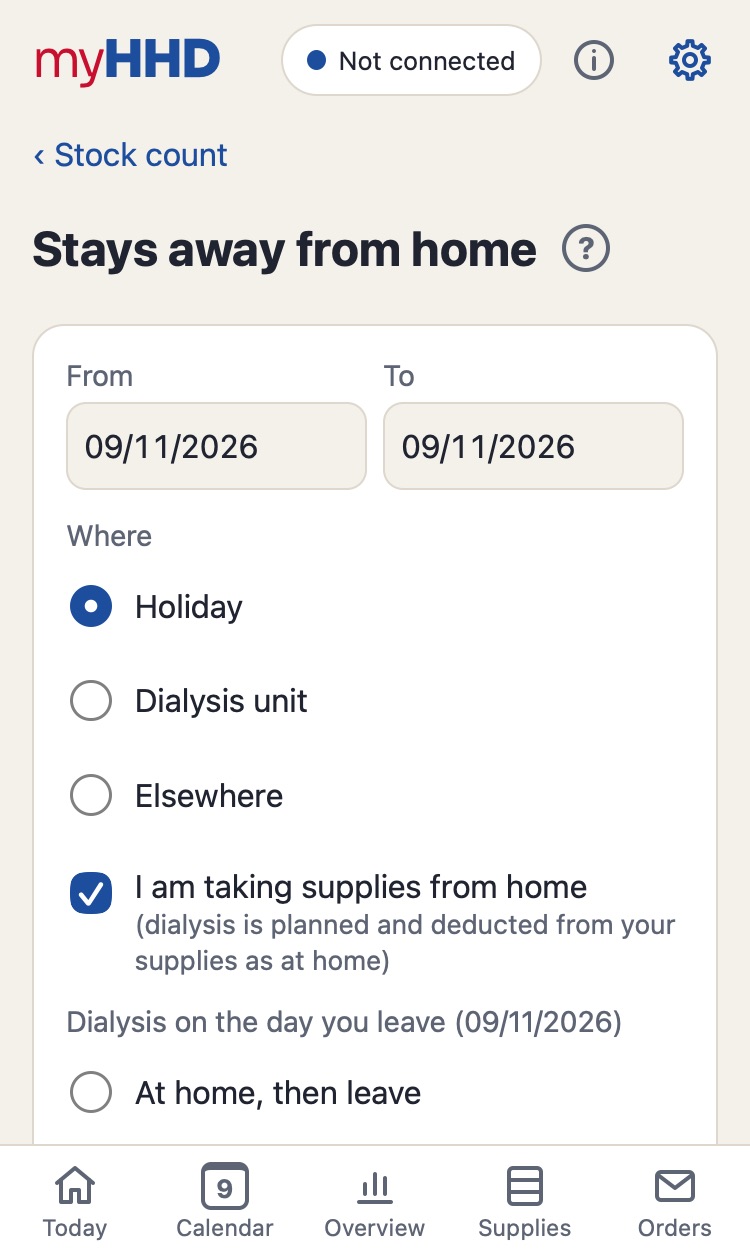
  1. Settings → Stays away from home.
  2. Fill in From, To and Where (Holiday, Dialysis unit, Elsewhere).
  3. Taking supplies from home? Tick I am taking supplies from home. Dialyses are then planned and deducted from your supplies as at home.
  4. Add stay.

Without supplies from home, the app does not plan home dialyses during the stay, does not remind you of changes and deducts nothing from your supplies. With supplies from home, it works out What to pack.

Stays away from home form with dates, place and the supplies from home optionWhat to pack list
↑ Contents

What to pack

A stay away from home with I am taking supplies from home.

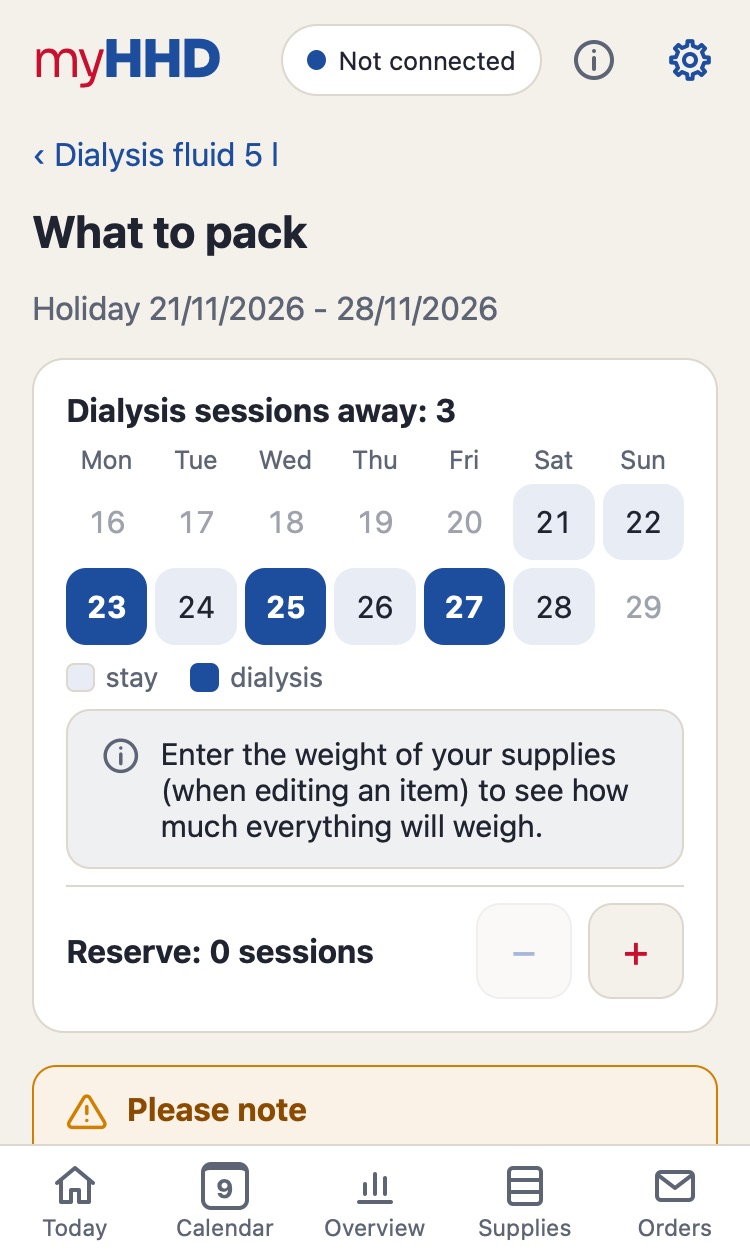
  1. From a week before you leave until you return, Today shows What to pack. Tap it.
  2. The list works out the materials for all dialyses while away.
  3. Add a reserve with the − and + buttons next to Reserve at the top, as a number of extra sessions. Each item then shows how much is planned and how much is reserve.
  4. For a different reserve on one item (say only 2 bags of solution), tap the pencil on the right and set the pieces. As calculated sets it back.
  5. Tick items off as you pack. If the quantity changes afterwards, the tick disappears so you do not pack too little.
  6. In Also remember, add your own things (charger, medication) with Edit list. The list is kept for all future stays.
  7. Items with the Manual rule (gauze, say) are on the list with a plan of 0. Set how many you take with the pencil, like a reserve.
  8. How much will it all weigh: enter the weight of your supplies in grams (Settings → Materials → item, Weight for travel), per item or per whole pack including packaging. For small things, tick Negligible weight. Set the weight of things in Also remember with the pencil next to them in Settings. The list then shows the weight of each item and Total about at the top, rounded up to whole kg.
  9. You can print the list or download it as a PDF with the buttons at the bottom.

If there will not be enough at home on the day you leave, the list warns you: in red when even the plan is not covered, in orange when the reserve is not.

What to pack list with materials for the stay
↑ Contents

Clinic review

Prepare for a clinic review

Before your review at the dialysis unit.

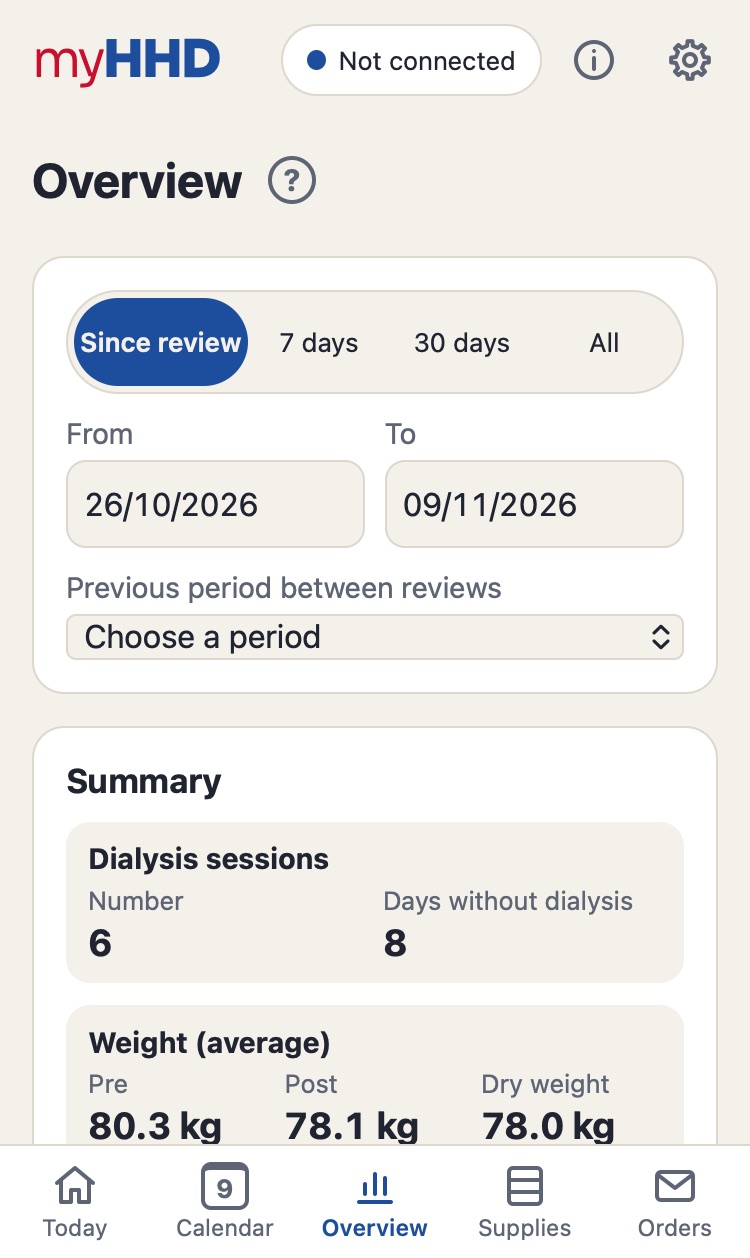
  1. Open Overview.
  2. The period runs from your last review; choose another at the top.
  3. Go through the summary, charts and the dialysis table.
  4. Download PDF or Excel and send or print it.

Record your review dates too (Settings → Clinic reviews, or in the day details), so the period always runs from one review to the next.

Overview with a summary since the last review
↑ Contents

Record a review and new details

After a review at the dialysis unit, or in advance when you know the date.

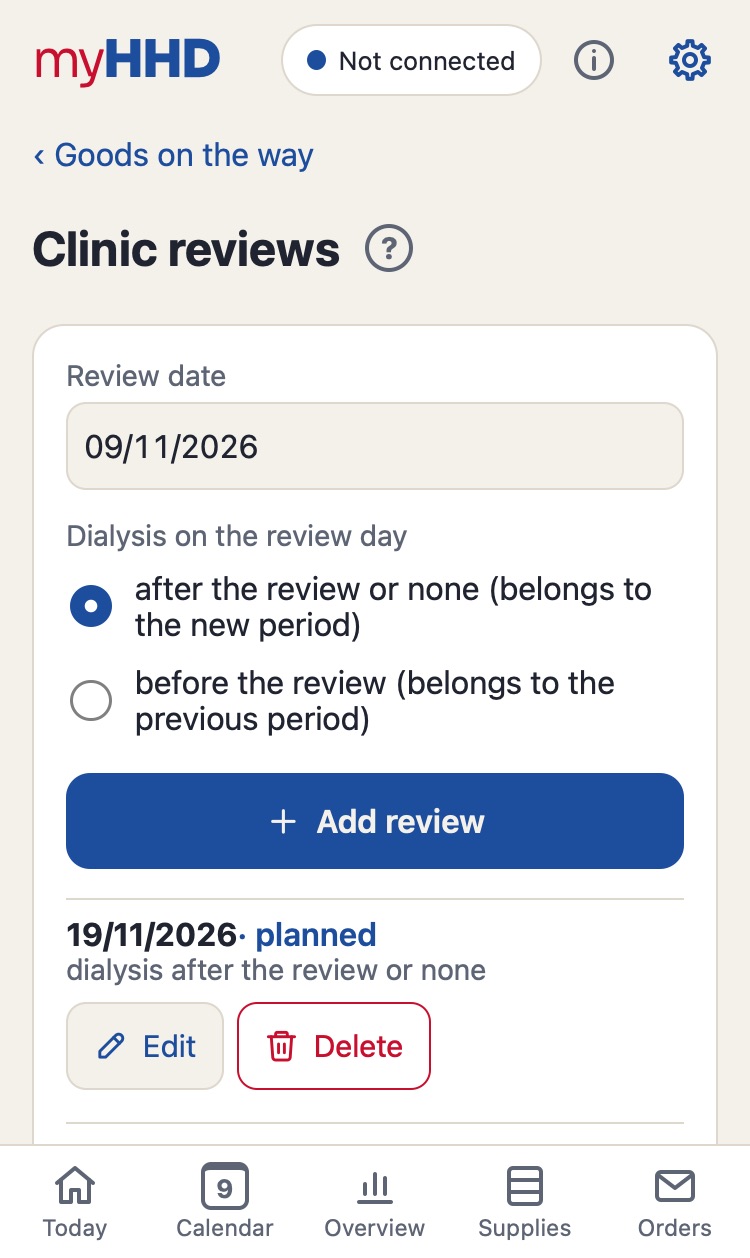
  1. Settings → Clinic reviews → Review date and Dialysis on the review day → Add review. You can also do this in the day details in the Calendar.
  2. Have your details changed? Settings → Review details → for example Dry weight → Save.
  3. Has your schedule changed? Settings → Dialysis schedule → the new days and the date it applies from. A temporary change also has an end date.
  4. Dialysing every other day, or on a different schedule every other week? Turn on Alternate two weeks, choose the days for Week A and Week B and pick which week the schedule starts with. The preview shows the first two weeks.

Review details are for reference only. The app does not use them to calculate any treatment settings.

Clinic reviews in Settings
↑ Contents

Data and devices

Backups and Google Drive

So that your data is not on just one phone and is available on other devices too.

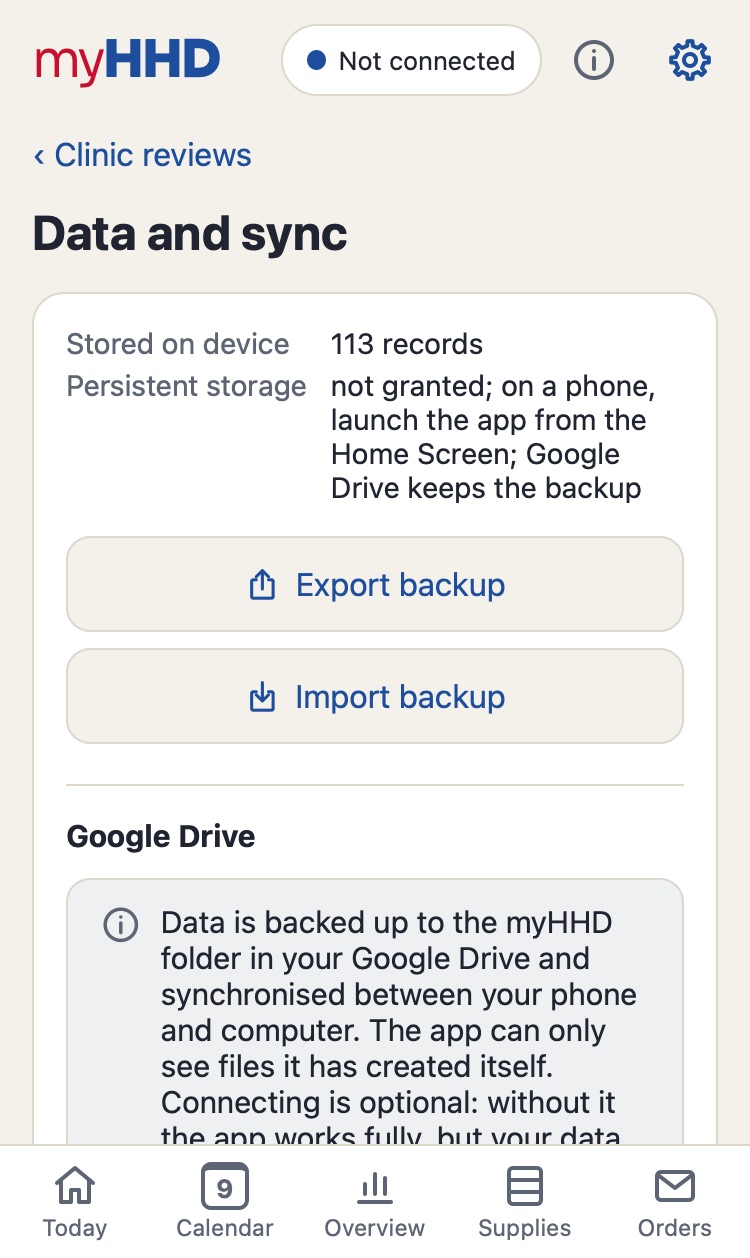
  1. Settings → Data and sync → Connect Google Drive.
  2. Sign in with your Google account and allow access. The app only sees the files it created itself (the myHHD folder in your Drive). Connecting is optional; the app works fully without it.
  3. Every change is then uploaded automatically. The label in the header shows the status, for example Synchronised.

You can also back up to a file without Google Drive: Export backup, then save the file to Files or send it to yourself. The Persistent storage line shows whether the browser may delete the data.

Data and sync settings with Connect Google Drive
↑ Contents

A new phone

You are switching phones, or want the app on a tablet or computer too.

  1. Install the app on the new device.
  2. Settings → Data and sync → Connect Google Drive with the same account as on the old phone.
  3. Your data downloads automatically. Wait until the label in the header says Synchronised.
  4. Selling or giving away the old phone? Remove it under Devices (Remove). It deletes its data the next time it connects.

Without Google Drive: Export backup on the old phone, move the file across and Import backup on the new one.

↑ Contents

Lost or stolen phone

A phone with the app is lost and you do not want the data to stay on it.

  1. On another device connected to Google Drive (or install the app and connect it), open Settings → Data and sync.
  2. Under Devices, tap Remove next to the lost phone and confirm with a second tap.
  3. As soon as the lost phone goes online, it uploads any records not yet sent and deletes its data and access.

Your records stay in your Google Drive and on your other devices.

↑ Contents

Restore data from a backup

Data on the device is missing or does not look right.

  1. First try Settings → Data and sync → Synchronise now. Often that is enough.
  2. With backups in Google Drive: Show backups → choose a backup by date → Restore and confirm with a second tap.
  3. From a file: Import backup and choose the saved backup file.

Restoring only adds missing records. It never removes or overwrites anything, so it is safe to try.

↑ Contents

When something is wrong

Something does not work

The app does something you did not expect, or shows an error.

  1. Settings → Report a problem (or the i icon in the header → Report a problem).
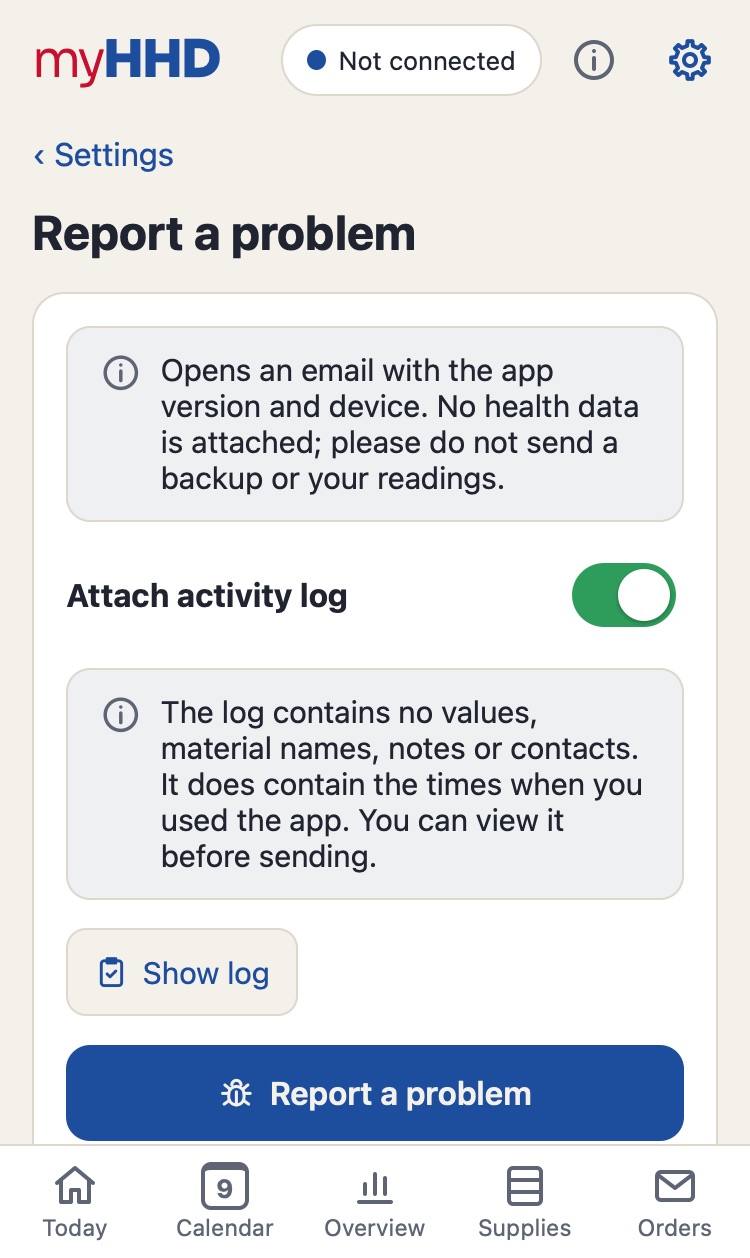
  2. Turn on Attach activity log. Show log shows exactly what will be sent.
  3. Tap Report a problem. On your phone choose Mail; on a computer the log is downloaded and you attach it to the e-mail.
  4. Describe what happened and what you were doing.

The activity log contains no values, material names, notes or contacts, only times and steps in the app. If a calculation looks wrong (supplies, order), a backup helps too: Settings → Data and sync → Export backup. Attach it only if you want to.
Report a problem screen with Attach activity log turned on
↑ Contents

Sync shows an error

The label in the header does not say Synchronised.

  1. Tap the label. It starts a sync, or the Google sign-in.
  2. Tap to sign in: access has expired; sign in again.
  3. Offline, Weak connection or Waiting to upload: your data is safe on the phone and changes upload by themselves once there is signal.
  4. Not synced 24 h: syncing has not worked for more than a day.
  5. Still an error? Settings → Data and sync shows what happened. If you are stuck, report a problem with the activity log.

Your data is safe on your phone even without internet. Nothing is lost; it is just uploaded later.

↑ Contents

A new version of the app

The app updates itself; there is nothing to download.

  1. When you open the app, a new version loads straight away.
  2. In the middle of your work it only offers a button: A new version of the app is ready. Tap to load it. That way a half-filled form is not lost.
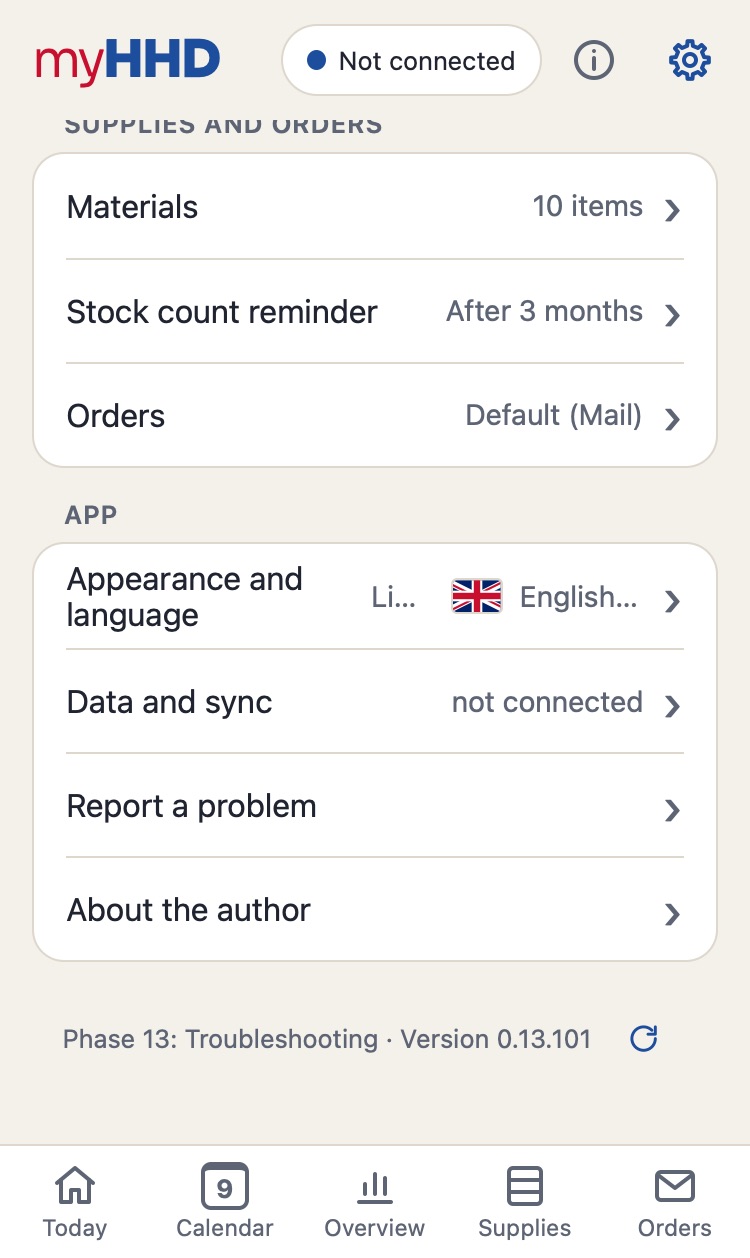
  3. To check manually: Settings → at the very bottom, next to the version number, the circular arrow icon (Check for a new version).
  4. After an update, What's new is shown once.
Bottom of Settings with the version number and the check for a new version button
↑ Contents

Cannot find what you need? Write to contact@myhhd.app. More: Privacy.